


The first 100 pre-orders for the E46 Digital Gauge Cluster are shipped.
We can proudly say the first 100 pre-orders for the E46 Digital Gauge Cluster are shipped.
There went a lot of development into this display to deliver you a high-quality Digital Cluster that could rival every OEM BMW display.

The first E46 Digital Gauge Cluster.
This is the first firmware version of the E46 Digital Gauge Cluster. Because there are many iterations of the BMW E46, there is a possibility there are some unknown bugs we haven't found. Don't worry! We composite a special team to work primarily on issues and performance. Have you found a bug? Please send it to E46 Bug Report so we can tackle it quickly and produce a firmware update.
Note: Depending on the year and model there could be some bugs which be fixed in the next firmware update:
Link to Bug Report: E46 Bug Report
How to install the E46 Digital Gauge Cluster?
You can find the instructions here: Download instructions
Or a short installation video :
Tools required:
4. Disconnect the wiring harness.
On the rear of the cluster, detach the connector by pressing the knots and switching the lever.

5. Remove the storage compartment.
Remove the storage compartment on the driver’s side door below your light switch by removing two Philips screws.
5.1. Optional - Controls in storage compartment
Place the control pad out of sight by locating it in the storage compartment. Us a step drill to make a hole and route the keypad wiring through the back.
5.2. Optional - USB in storage compartment
Place the (optional) USB extension cable inside the storage compartment. Us a step drill to make a hole and make it square with a file. Press in the USB extension cable, locking it in place.
6. Connect the supplied wiring harness.
The supplied wiring has two connectors that go into the original wiring. Connect these and push the remaining wiring down in the dashboard to create room for the digital gauge cluster.
Route the control pad cable to the underside of the dashboard or the storage compartment.
7. Connect the Digital Gauge Cluster.
Now connect the two connectors to the Digital Gauge Cluster before placing it into the dashboard.
7.1. Optional - USB extension cable
Route the USB extension cable from the storage compartment to the cluster and connect it.
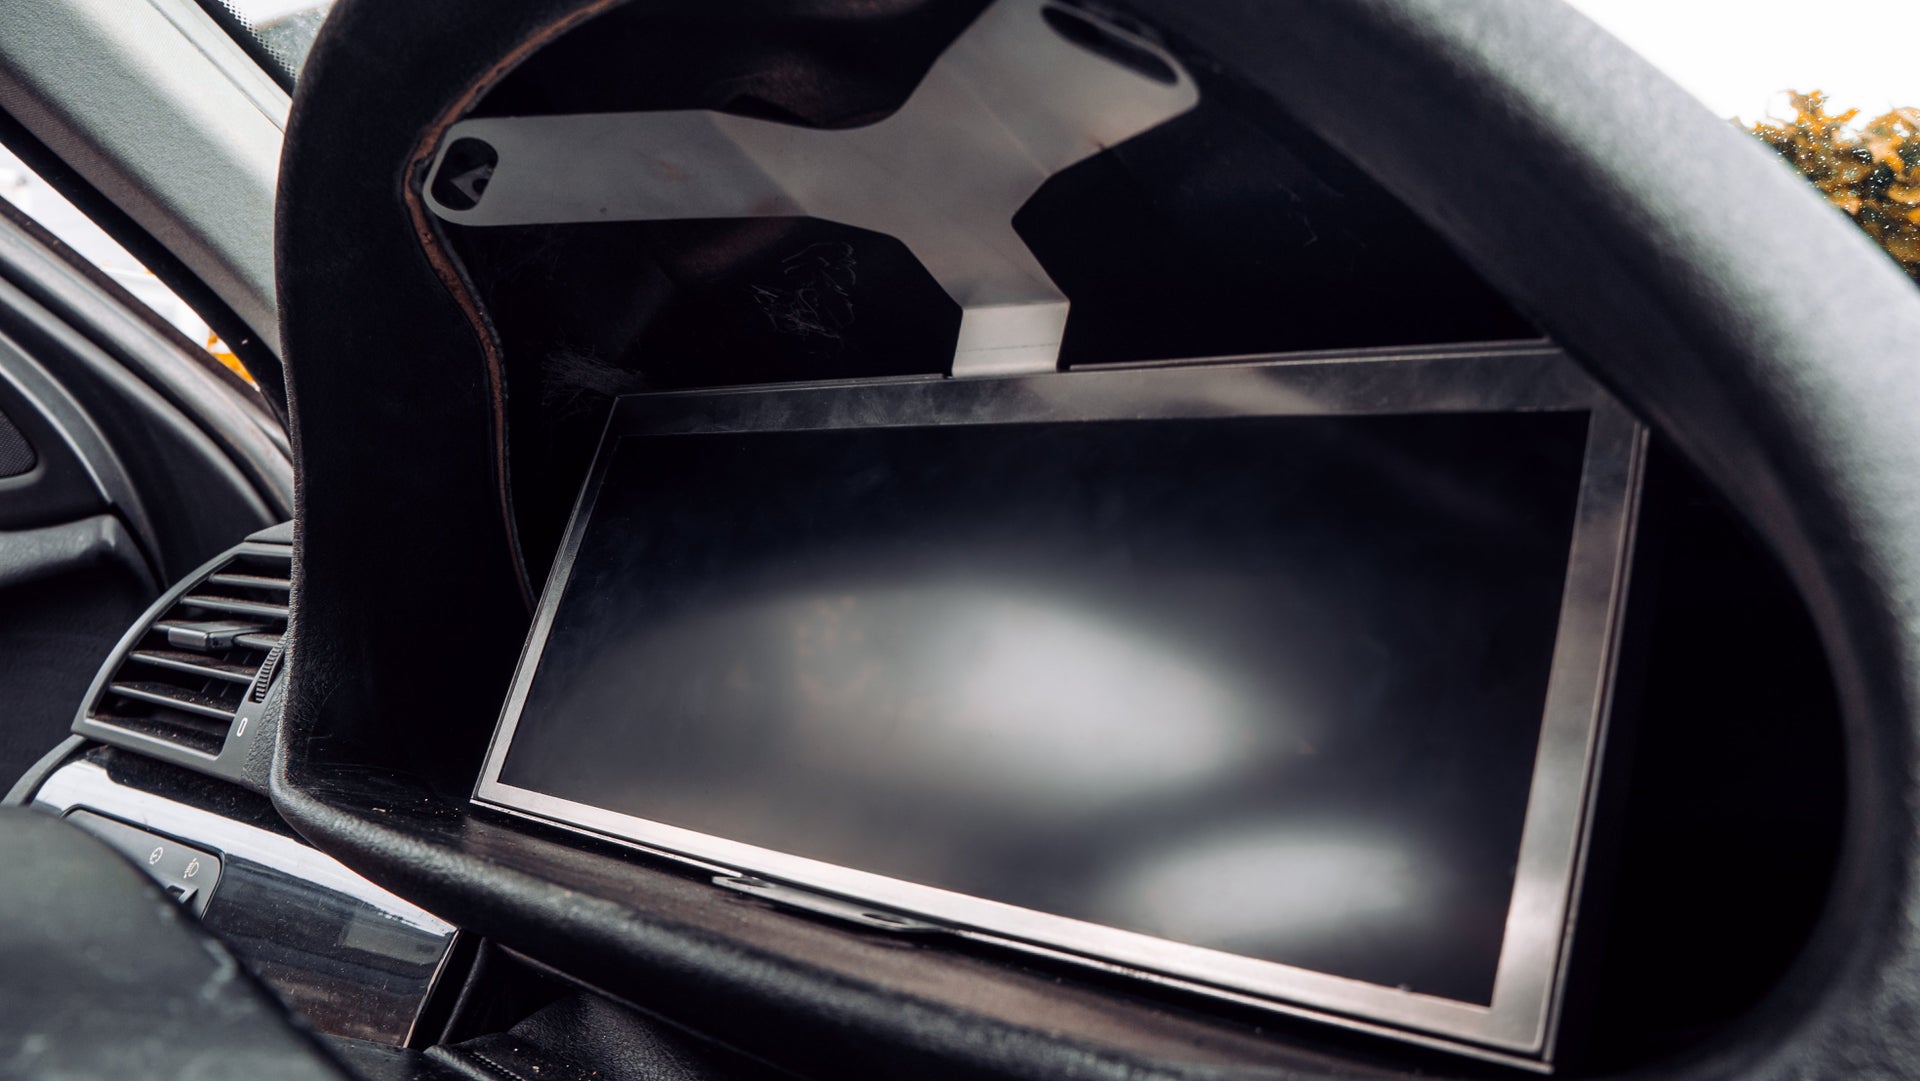
8. Place the Digital Gauge Cluster.
Position the Cluster in its location, placing it behind the dashboard. Place the right corner first, holding it at 30° degrees from the dashboard and tilting it 45° degrees forwards.
9. Place the front cover.
Align the digital gauge cluster with the top mounts.
Note: The clips of the top mounts are adjustable. Make sure these are fitted correctly.
Clip the bottom from the front cover into the cluster. Make sure it is tight to the cluster. Next, fit the top part snug to the cluster, align it with the mounting points, and secure the Torx screws.

10. Reconnect the battery.
Close the door and reconnect the battery.
Now you will be able to start the digital gauge cluster by putting in your key.
11. Adjust your menu settings.
You can adjust the digital gauge cluster settings with the keypad. Make sure the last digits of the milage are set, the time and date.
Now you can customize your cluster with themes, indicators, and change max. ranges of the RPM and Speed.
12. Installation finished.
Once all the above steps are complete, the installation is finished.
Do you have difficulty with the installation, please send an email to: Technicalsupport@ID4Motion.com
How to update your Digital Gauge Cluster?
You can find the latest firmware version here: Firmware
Installing a firmware update:
There went a lot of development into this display to deliver you a high-quality Digital Cluster that could rival every OEM BMW display.

The first E46 Digital Gauge Cluster.
This is the first firmware version of the E46 Digital Gauge Cluster. Because there are many iterations of the BMW E46, there is a possibility there are some unknown bugs we haven't found. Don't worry! We composite a special team to work primarily on issues and performance. Have you found a bug? Please send it to E46 Bug Report so we can tackle it quickly and produce a firmware update.
Note: Depending on the year and model there could be some bugs which be fixed in the next firmware update:
- Air-conditioner, could experience strange behavior. We are mapping out in which models this is the case.
- DSC, shows an error depending on some conditions.
- SMG, gearlevels will be implemented in the next update.
- Performance, will increase true the different firmware updates.
Link to Bug Report: E46 Bug Report
How to install the E46 Digital Gauge Cluster?
You can find the instructions here: Download instructions
Or a short installation video :
Tools required:
- 10mm (3/8 inch) wrench,
- T10 Torx bit,
- Phillips screwdriver
- Step Drill + file (Optional)
1. Disconnect the battery.
Before you disconnect the battery, take a picture of your current mileage and maintenance .
Locate your battery (based in the car’s boot). Disconnect the negative battery terminal.
When working on your car’s electrical system, always disconnect your battery.
2. Adjust the steering wheel.
Adjust the steering wheel position with the lever on the side. Move it down and towards you, out of the way.
(Protect the steering wheel with a towel to prevent scratches.)
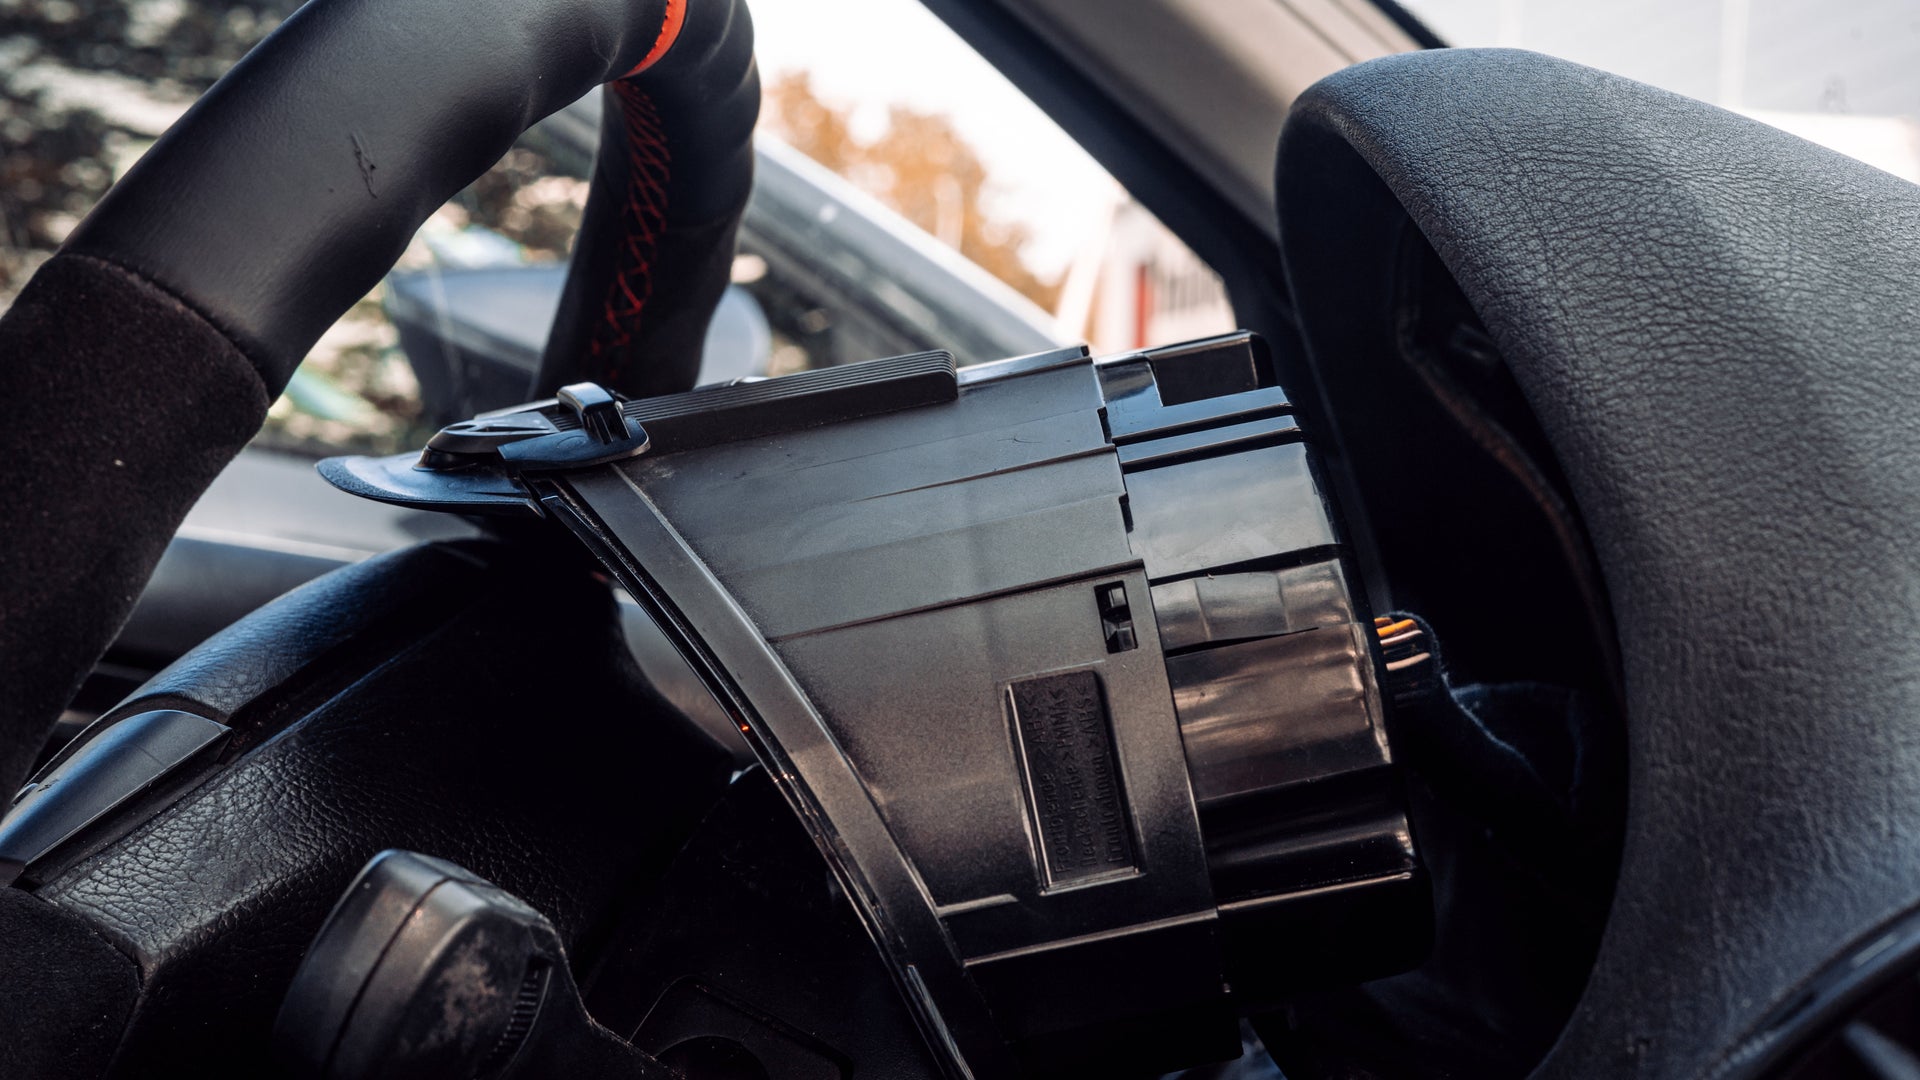
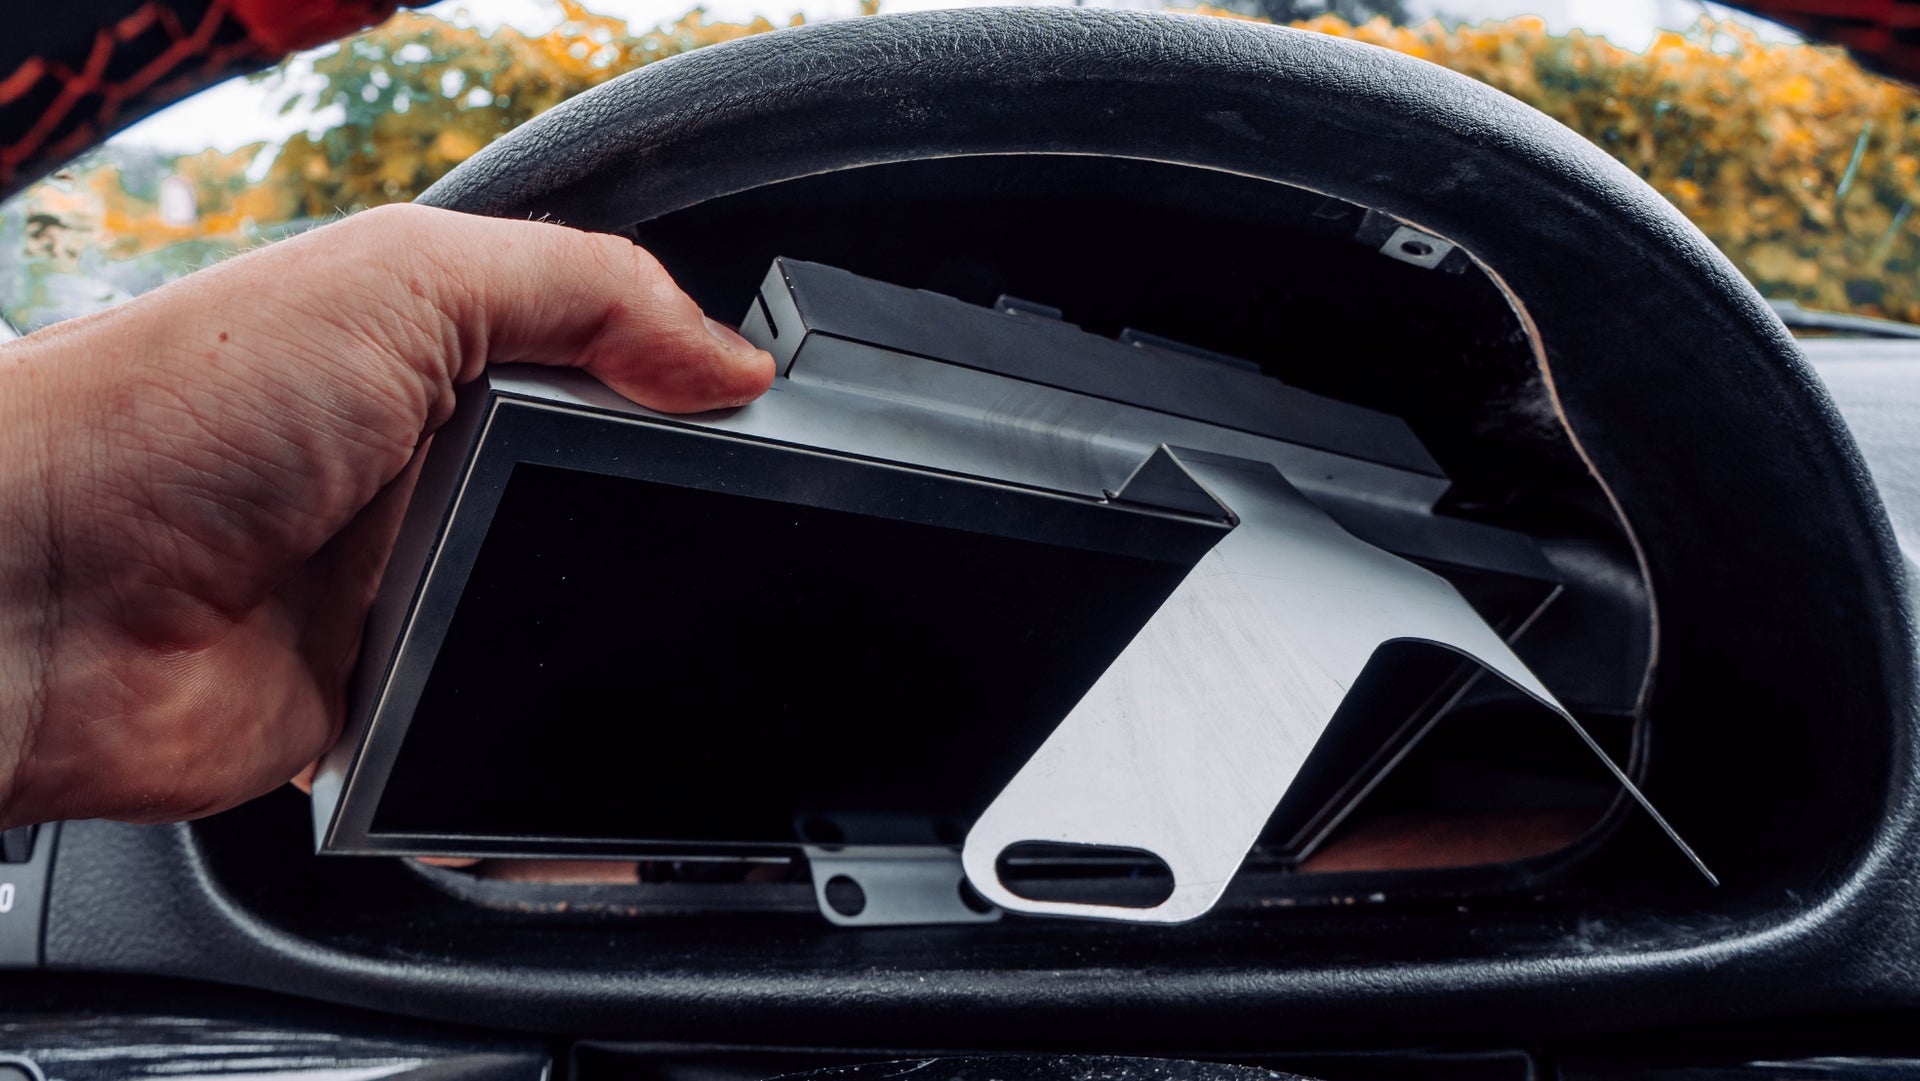
3. Remove the original cluster.
Remove the two T10 Torx screws on the top of the cluster. Pull and tilt the cluster towards you, removing it from the dashboard.

4. Disconnect the wiring harness.
On the rear of the cluster, detach the connector by pressing the knots and switching the lever.

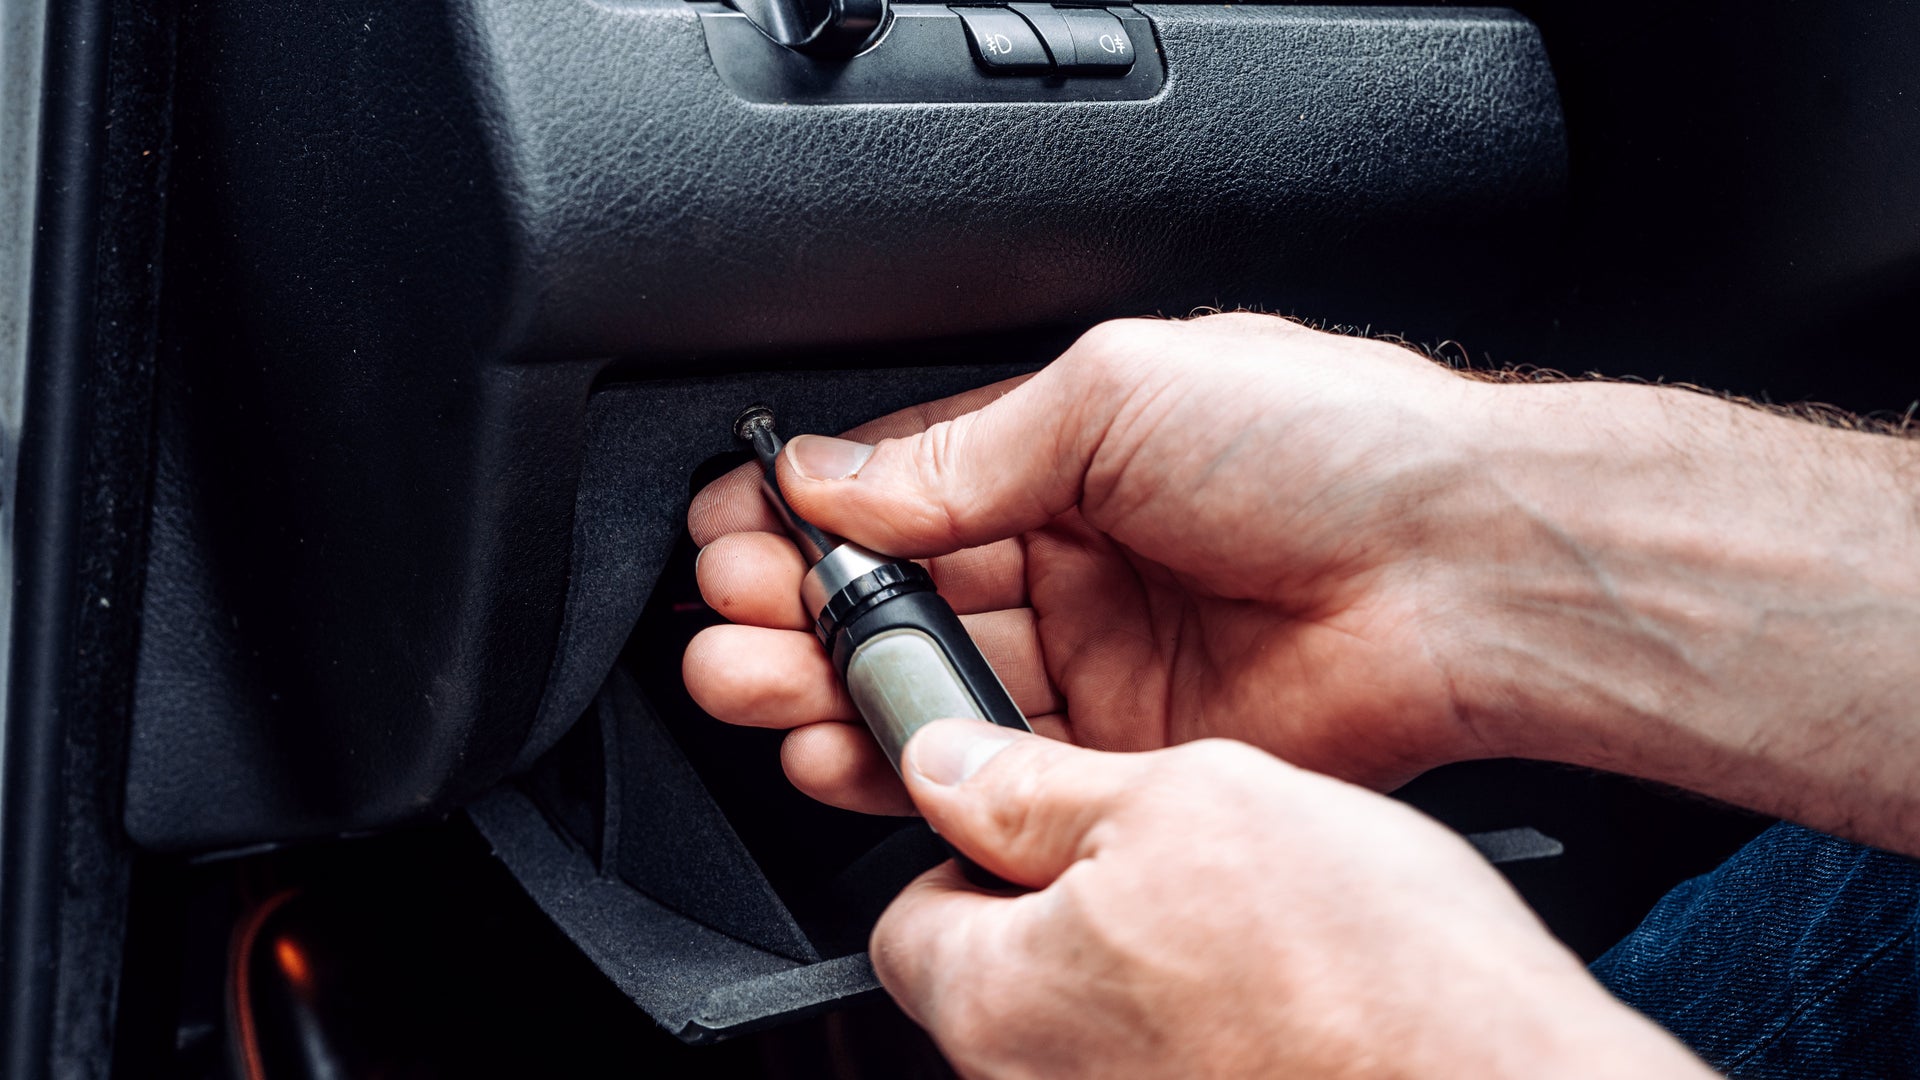
5. Remove the storage compartment.
Remove the storage compartment on the driver’s side door below your light switch by removing two Philips screws.

5.1. Optional - Controls in storage compartment
Place the control pad out of sight by locating it in the storage compartment. Us a step drill to make a hole and route the keypad wiring through the back.

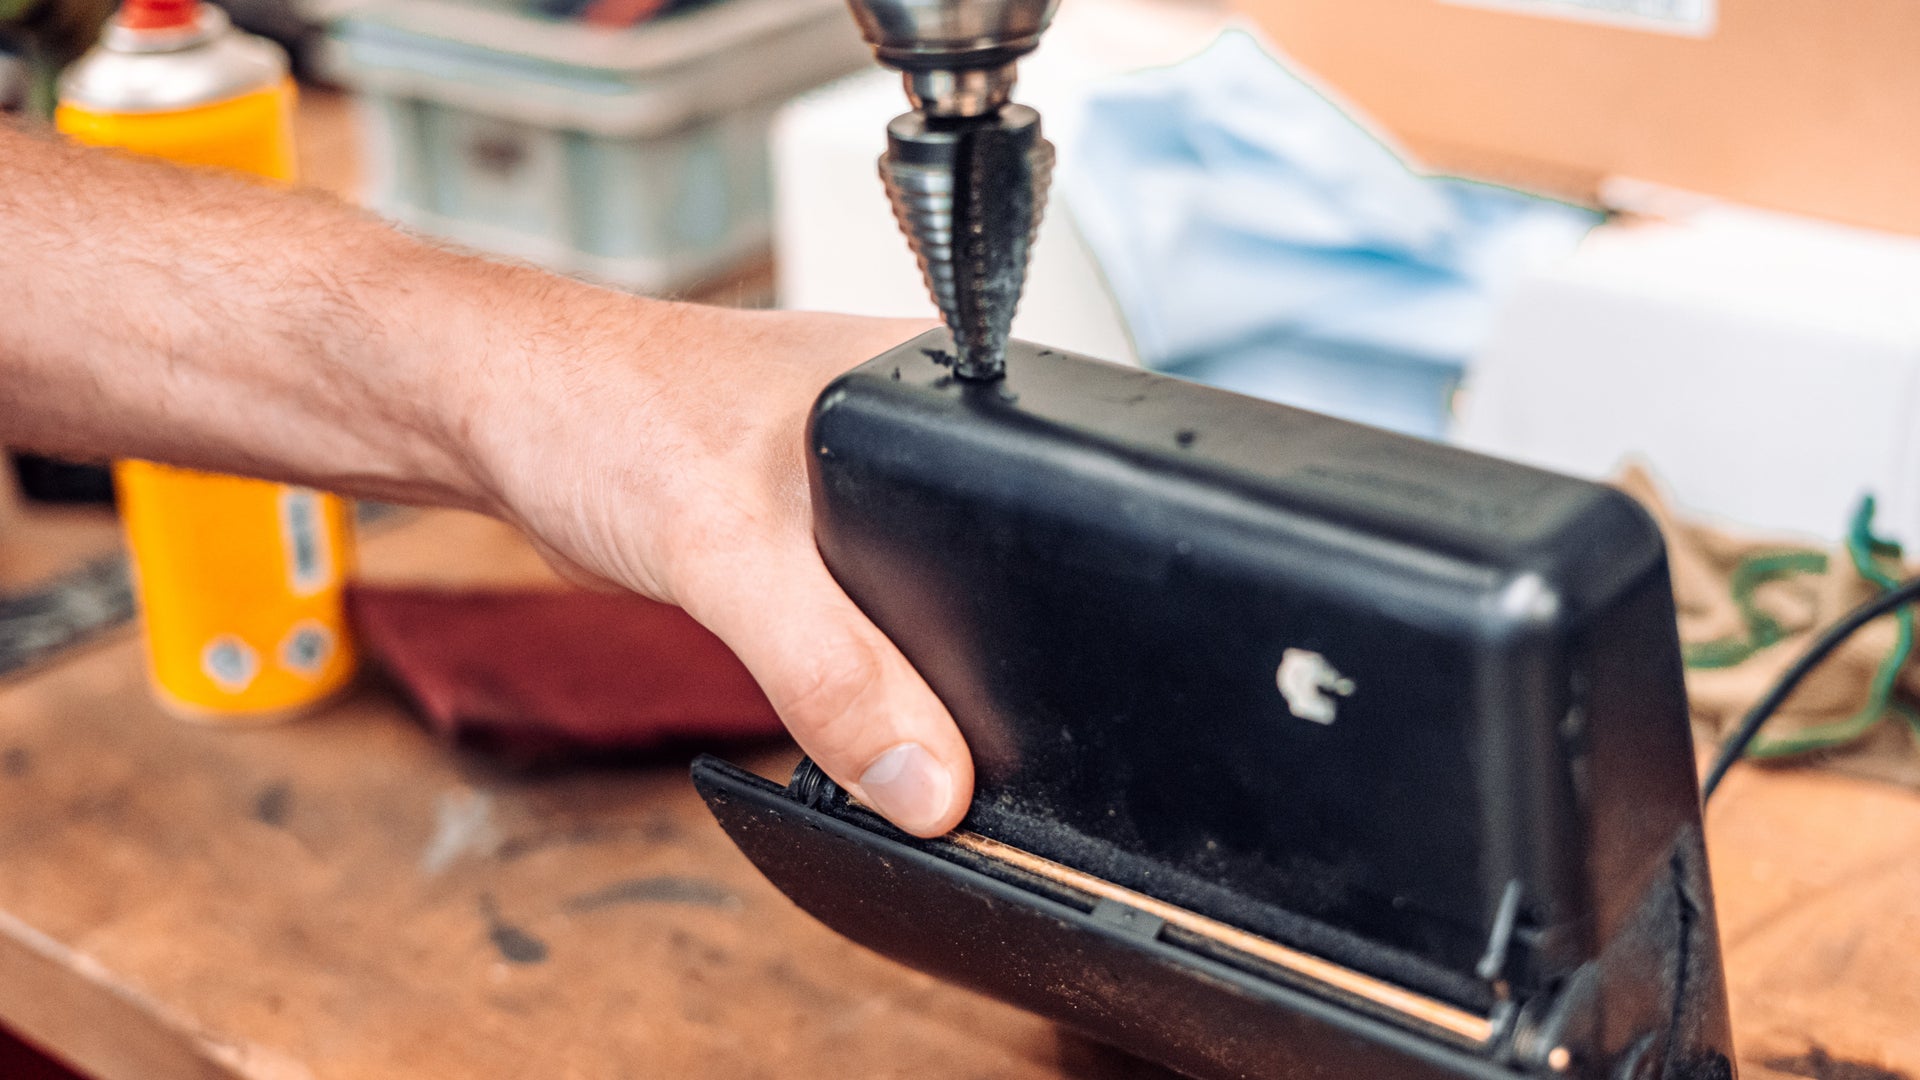
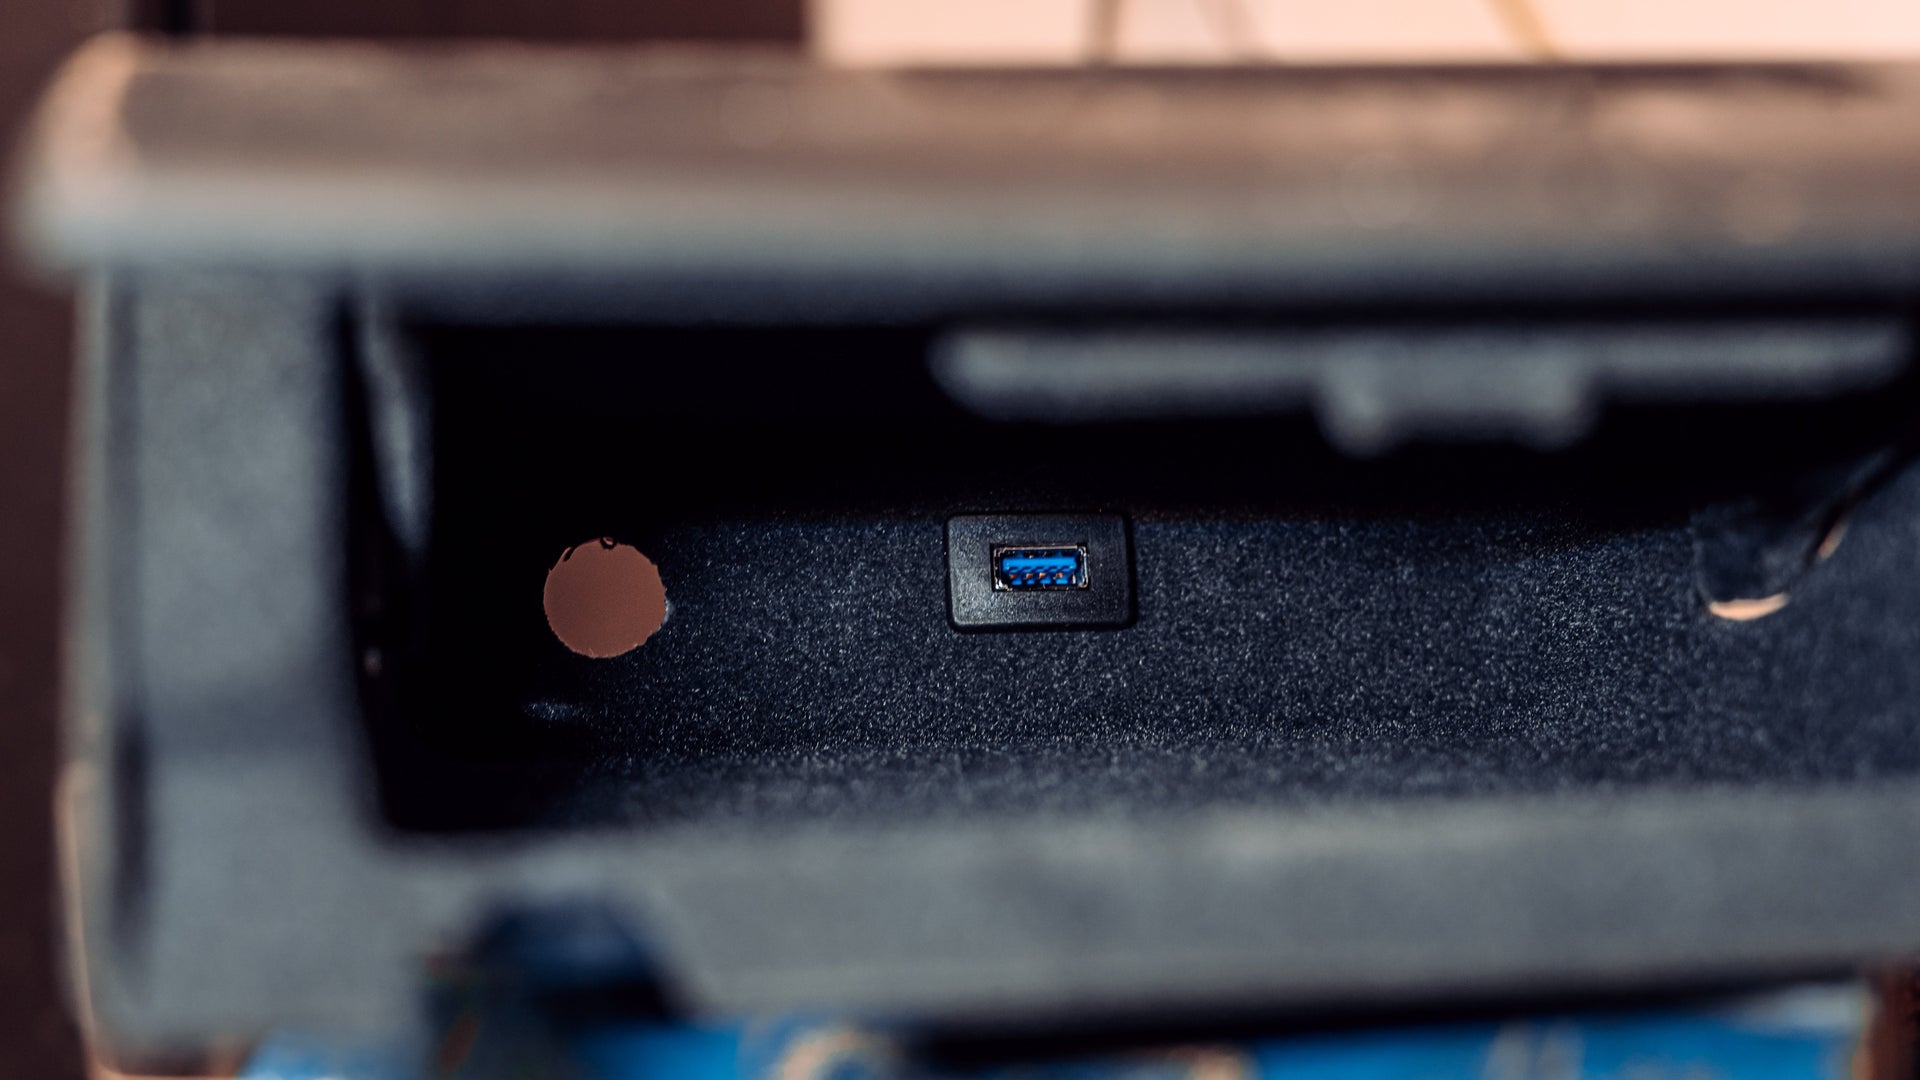
5.2. Optional - USB in storage compartment
Place the (optional) USB extension cable inside the storage compartment. Us a step drill to make a hole and make it square with a file. Press in the USB extension cable, locking it in place.

6. Connect the supplied wiring harness.
The supplied wiring has two connectors that go into the original wiring. Connect these and push the remaining wiring down in the dashboard to create room for the digital gauge cluster.
Route the control pad cable to the underside of the dashboard or the storage compartment.
7. Connect the Digital Gauge Cluster.
Now connect the two connectors to the Digital Gauge Cluster before placing it into the dashboard.
7.1. Optional - USB extension cable
Route the USB extension cable from the storage compartment to the cluster and connect it.
8. Place the Digital Gauge Cluster.
Position the Cluster in its location, placing it behind the dashboard. Place the right corner first, holding it at 30° degrees from the dashboard and tilting it 45° degrees forwards.


9. Place the front cover.
Align the digital gauge cluster with the top mounts.
Note: The clips of the top mounts are adjustable. Make sure these are fitted correctly.
Clip the bottom from the front cover into the cluster. Make sure it is tight to the cluster. Next, fit the top part snug to the cluster, align it with the mounting points, and secure the Torx screws.

10. Reconnect the battery.
Close the door and reconnect the battery.
Now you will be able to start the digital gauge cluster by putting in your key.
11. Adjust your menu settings.
You can adjust the digital gauge cluster settings with the keypad. Make sure the last digits of the milage are set, the time and date.
Now you can customize your cluster with themes, indicators, and change max. ranges of the RPM and Speed.
12. Installation finished.
Once all the above steps are complete, the installation is finished.
Do you have difficulty with the installation, please send an email to: Technicalsupport@ID4Motion.com
How to update your Digital Gauge Cluster?
You can find the latest firmware version here: Firmware
Installing a firmware update:
- Download the .jdm file
- Copy the .jdm file to a USB stick
- Turn on the Digital Gauge Cluster.
- Put the USB stick into the USB Extention of the Cluster
- The Digital Gauge Cluster will update automatically.
Leave a comment
Comments will be approved before showing up.